“How do you change the time a screenshot was created?” asked a friend yesterday. What a curious question, I thought. “What’s up?” I asked? So, she explained the situation that required a file that she generated after a deadline to have a certain date and time. Apparently, the people who would receive the image would check.

Putting aside whether I should help her skirt the rules, I wondered, “How does one do that?” Although there were a wealth of tutorials available online, the one I settled on involved a freeware program.
Step 1 - Getting the Right Software
You can find a lot of websites that say they will let you alter the “metadata” or “EXIF” data. To be honest, I found myself a bit confused at all the claims. And, what was needed was to change the date. This tutorial at Organize Pictures was spot on. The author explains it in this way:
Before learning how to change photo date and time, you need to know what a digital photo date and time is. This piece of photo metadata is called a photo’s timestamp. Every camera records when a digital photo has been taken. This information is being recorded in the EXIF photo metadata and it is saved with a JPEG photo in a field called Date Picture Taken. Now, different software may call this field slightly differently, but they all refer to a digital photo’s timestamp.
The freeware software to get the job done is XnView, and it’s available in Windows, Mac, and GNU/Linux flavors.
XnView MP is provided as FREEWARE (NO Adware, NO Spyware) for private or educational use (including non-profit organizations). If you enjoy using XnView, Don’t hesitate to help the developer with a small donation. (Note: XnView is the source for the image appearing immediately below showcasing its interface).

Step 2 - Changing the Date and Time in a Photo/Image
These steps below have been modified from the Organize Pictures tutorial to reflect my journey:
- Click once on the image thumbnail
- Right click on the image thumbnail
- Go to Metadata option, which will expand to offer several options, including “Change timestamp”
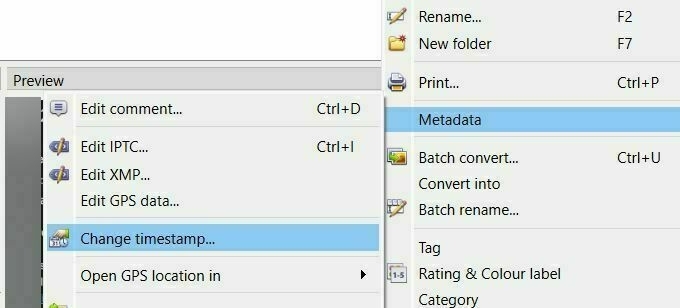
- Adjust the date and time (as shown in the image below) then
- Click “Write”

And, that’s it! Pretty easy.